User Tools
Site Tools
This is an old revision of the document!
Table of Contents
!!!!! UNDER CONSTRUCTION !!!!!
NB2800 File Server
This Article describes how to install a file server on the NB2800 router.
If you need instructions on how to set up a LXC Container on NB2800 Routers, you can refer to this page: http://wiki.netmodule.com/app-notes/virtualisation.
In this setup, three programs are installes which gives you different ways to transfer files to your router. In addition, a way is shown to transfer files from an USB stick to your container:
1) Preparations
The first step you should take is to give your router a static IP adress. For this, use
nano /etc/network/interfaces
and set up a static IP configuration for your primary interface. In this example, the configuration for the eth0 interface looks like this:
After that, use
apt-get update
and
apt-get upgrade
to bring your system up to date.
If your network setup doesn't include a domain you could use on your router, you can easily create one you can use to access your file server.
For this, get access to the routers web interface and go to Services → DNS Server. Under “Static Hosts” , click on the plus symbol to add a new domain name.
Now enter the IP address and the domain name you want it linked to and click “Apply”
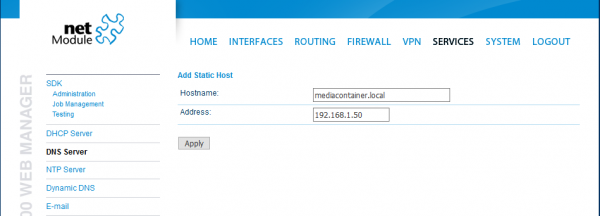
After this, your configuration should look like this:
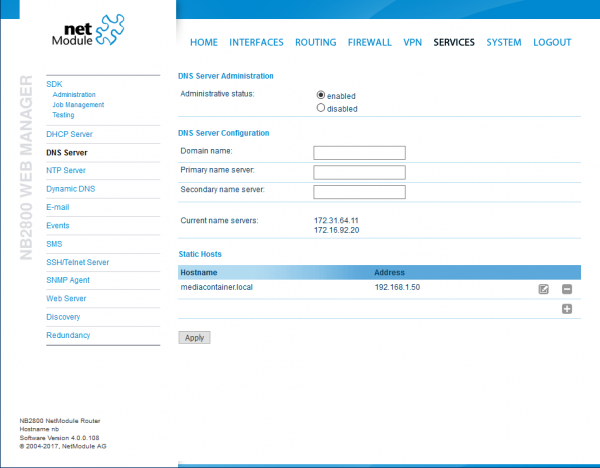
Now you can access the file server with both its IP address a its local domain name.
2) The vsftpd FTP server
Vsftpd (Very Secure File Transfer Protocol Deamon) is a very compact and secure FTP server. It provides a high amount of data security and user management features.
To install the program, use
apt-get install vsftpd
In the first step, a new user account is created. This user is only for file transfer purposes, so he needs no further rights and no shell access on the machine. In this case, this user is calles “ftpuser”. To create this user, type
adduser ftpuser --shell /bin/false/
In the next step, the new non-existing shell must be told to the system. To do this, enter
nano /etc/shells
and in a new line add
- /etc/shells
/bin/false
After that, create new folders whrere you can store your media files. In this example, these folders are created in the /home directory, but you are totally free to create them elsewhere. In addition, all necessary rights are given to that folders:
mkdir -p /home/Media
mkdir /home/Media/ Bilder Videos Musik
chmod 755 /home/Media
chmod 777 /home/Media Bilder Videos Musik
If you want to encrypt your connections to your file server and don't have any SSL keys available you could import, you can easily create some on your own. For this, use
openssl req -x509 -nodes -days 365 -newkey rsa:2048 -keyout /etc/ssl/private/vsftpd.key -out /etc/ssl/private/vsftpd.pem
to create a pair of keys. In this configuration, these keys have a 2048bit strong encryption and a runtime of 365 days, but you can change these setting on your needs.
The main configuration of vsftpd is made in the /etc/vsftpd.conf file. Here you can see a exemplary configuration:
- /etc/vsftpd.conf
userlist_enable=YES
userlist_deny=NO
local_root=/home/Media
allow_writeable_chroot=YES
force_ssl_enable=YES
force_local_data_ssl=YES
force_local_logins_ssl=YES
ssl_ciphers=HIGH
ssl_enable=YES
rsa_cert_file=/etc/ssl/private/vsftpd.pem
rsa_private_key_file=/etc/ssl/private/vsftpd.key
listen=YES
listen_ipv6=NO
anonymous_enable=NO
local_enable=YES
write_enable=YES
In the /etc/passwd file, you have to correct the home path of the ftpuser to the path where the media folders are located:
- /etc/passwd
ftpuser:x:1000:1000:,,,:/home/Media:/bin/false
In the last step, you have to add the ftpuser to the /etc/vsftpd.user_list file to use him for logins to the FTP server:
3) Net2FTP
Net2FTP (Homepage) is a web interface for FTP servers. With this, you can up-and download files to your server just with your web browser and without the need of additional tools like FileZilla.
First, you have to download the Software from this Site (net2ftp_v1.1.zip, 6MB). After unzipping the folder, you now have a folder named “filed_to_upload”. Rename this folder to a name you want to access your file server later (e.g. FTPserver).
In the next step, you have to install a web server and PHP in your container:
apt-get install apache2
apt-get install php7.0-common php7.0-fpm php7.0-cli php7.0-json php7.0-mysql php7.0-curl php7.0-intl php7.0-mcrypt php-pear php7.0-gd php7.0-zip php7.0-xml php7.0-mbstring php-imagick libapache2-mod-php7.0
-Ordner “FTP” in Webserver-Verzeichnis (/var/www/html) hochgeladen
—nano /var/www/html/upload/settings.inc.php: (geändert) $net2ftp_settings[“max_filesize”] = “10000000000”; $net2ftp_settings[“check_consumption”] = “no”;
—nano /etc/php/7.0/apache2/php.ini (geändert): upload_max_filesize = 10G post_max_size = 11G memory_limit = -1 max_execution_time = 9600 max_input_time = 3600
—nano /etc/apache2/apache2.conf (hinzugefügt): LimitRequestBody 0
—/etc/init.d/apache2 restart
4) The samba file server
—apt-get install samba-common samba tdb-tools
—smbpasswd -a ftpuser Passwort: mediac0ntr0l
—nano /etc/samba/smb.conf (Hinzufügen am Ende) [Fotos] path = /home/Media/Bilder writeable = yes
[Videos] path = /home/Media/Videos writeable = yes
[Musik] path = /home/Media/Musik writeable = yes —EOF—
—testparm
—service smbd restart
5) transfer files with an USB Stick
 In der NB2800-UI zunächst die USB-Funktion aktivieren:
Interfaces - USB - Administration - enabled
In der NB2800-UI zunächst die USB-Funktion aktivieren:
Interfaces - USB - Administration - enabled
- “- - Autorun - enabled
-hier sollte man sich die autorun.key-Datei herunterladen. Diese enthält den Hash-Wert des Passworts, mit dem man sich auf dem Router angemeldet hat; sie ist also notwendig, um den Besitzer des USB-Sticks als zum Ausführen von Aktionen berechtigt zu identifizieren.
Diese autorun.key-Datei muss zusammen mit einer autorun.sh-Datei auf dem USB-Stick gespeichert werden.
FAT16 oder FAT32
-Dateien auf dem Stick werden auf den Router kopiert wobei existente Dateien ignoriert werden.
-Die Ordnerinhalte auf dem Router werden 1:1 mit den Ordnern auf dem Stick synchronisiert. D.h. wenn eine Datei auf dem Stick gelöscht wird wird sie auch auf dem Router glöscht usw.