User Tools
Site Tools
How to setup Nextcloud on a NB2800 router
This article describes how to setup a Nextcloud server on your NB2800 router.
Nextcloud is a free and open source cloud hosting software. It lets you easily share your files with others, hosts your own calenders and contact lists and lets you customize your cloud with a lot of tools and additional apps.
Preparations
If you need instructions on how to set up a LXC Container on NB2800 Routers, you can refer to this page: http://wiki.netmodule.com/app-notes/virtualisation.
The first step you should take is to give your router a static IP adress. For this, use
nano /etc/network/interfaces
and set up a static IP configuration for your primary interface. In this example, the configuration for the eth0 interface looks like this:
After that, use
apt-get update
apt-get upgrade
to bring your system up to date.
If your network setup doesn't include a domain you could use on your router, you can easily create one you can use to access your file server.
For this, get access to the routers web interface and go to Services → DNS Server. Under “Static Hosts” , click on the plus symbol to add a new domain name.
Now enter the IP address and the domain name you want it linked to and click “Apply”
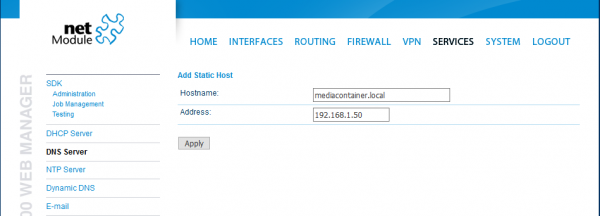
After this, your configuration should look like this:
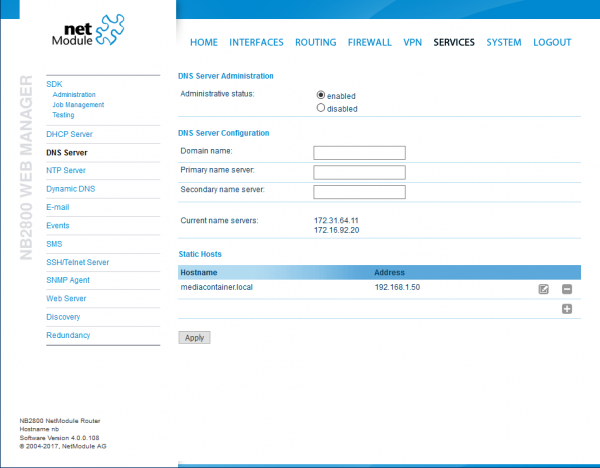
Now you can access the file server with both its IP address a its local domain name.
Installations
Before Nextcloud can be installed, a web server (here: Nginx), a SQL program (here: MariaDB) and PHP need to be installed and set up. In the first step, install these programs by entering
apt-get update
apt-get install nginx mariadb-client mariadb-server php7.0-common php7.0-fpm php7.0-cli php7.0-json php7.0-mysql php7.0-curl php7.0-intl php7.0-mcrypt php-pear php7.0-gd php7.0-zip php7.0-xml php7.0-mbstring php7.0-apcu
Now, the Nextcloud folder is created and given to the correct user:
mkdir -p /var/www/nextcloud
chown -R www-data:www-data /var/www
Configuring PHP
For setting up PHP, several values in three files have to be edited. First, go to /etc/php/7.0/fpm/pool.d/www.conf and edit the following values (Note: all values described here have to be edited, decommented, or added):
- /etc/php/7.0/fpm/pool.d/www.conf
user = www-data
group = www-data
listen = /run/php/php7.0-fpm.sock
env[HOSTNAME] = $HOSTNAME
env[PATH] = /usr/local/bin:/usr/bin:/bin
env[TMP] = /tmp
env[TMPDIR] = /tmp
env[TEMP] = /tmp
Next, go to /etc/php/7.0/fpm/php.ini and edit these values:
- /etc/php/7.0/fpm/php.ini
cgi.fix_pathinfo = 0
opcache.enable = 1
opcache.enable_cli = 1
opcache.memory_consumption = 128
opcache.interned_strings_buffer = 8
opcache.max_accelerated_files = 10000
opcache.revalidate_freq = 1
opcache.save_comments = 1
The last file for configuring PHP is /etc/php/7.0/cli/php.ini:
- /etc/php/7.0/cli/php.ini
cgi.fix_pathinfo = 0
Now enter
service php7.0-fpm restart
to restart PHP.
Configuring MariaDB
First, you have to finish the MariaDB installation:
mysql_secure_installation
Here you have to enter your root password. All other questions can be answered with (Y)es.
Before going on, you need to restart MariaDB:
service mysql restart
Now you have to create a new MariaDB database and an user which is only needed for Nextcloud access. To enter the MariaDB shell, enter
mysql -u root -p
First, you have to create a new database for Nextcloud. Here this database is called “nextcloud_db”, but you can name it however you want to:
create database nextcloud_db;
Now create a new MariaDB user with a password which can access the “nextcloud_db”:
create user 'user'@localhost identified by 'password';
Note that you have to enter your own credentials for 'user' and 'password'.
Now all necessary rights have to be granted to this new user:
grant all privileges on nextcloud_db.* to 'user'@localhost;
flush privileges;
Now that everything is set up correctly, you can leave the MariaDB shell:
exit;
Now three lines have to be added to some configuration files:
echo "log-bin = /var/log/mysql/mariadb-bin" >> /etc/mysql/my.cnf
echo "log-bin-index = /var/log/mysql/mariadb-bin.index" >> /etc/mysql/my.cnf
echo "binlog_format = mixed" >> /etc/mysql/my.cnf
Now restart MariaDB again:
service mysql restart
Configuration Nginx
First, go to /etc/nginx/nginx.conf and edit the following three lines:
- /etc/nginx/nginx.conf
user = www-data
worker_process = auto
server_tokens off
In the next step, the Nginx default page needs to be backuped and stored:
mv /etc/nginx/sites-available/default /etc/nginx/sites-available/default.backup
Now, a new default page needs to be created:
nano /etc/nginx/sites-available/default
This new file has to be filled with this code (All passages that need to be edited are marked in the code):
- /etc/nginx/sites-available/default
upstream php-handler {
server unix:/run/php/php7.0-fpm.sock;
}

server {
    listen 80;
    server_name mediacontainer.local;		//* edit to own domain name *//
    # enforce https
    return 301 https://$server_name$request_uri;
}

server {
    listen 443 ssl http2;
    server_name mediacontainer.local;		//* edit to own domain name *//

    ssl_certificate /home/NCUser/CA/cacert.pem;			//* edit to own files and directorys *//
    ssl_certificate_key /home/NCUser/CA/private/cakey.pem;	//* edit to own files and directorys *//

    # Add headers to serve security related headers
    # Before enabling Strict-Transport-Security headers please read into this
    # topic first.
    add_header Strict-Transport-Security "max-age=63072000; includeSubdomains" always;
    # includeSubDomains; preload;";
    #
    # WARNING: Only add the preload option once you read about
    # the consequences in https://hstspreload.org/. This option
    # will add the domain to a hardcoded list that is shipped
    # in all major browsers and getting removed from this list
    # could take several months.
    add_header X-Content-Type-Options nosniff;
    add_header X-XSS-Protection "1; mode=block";
    add_header X-Robots-Tag none;
    add_header X-Download-Options noopen;
    add_header X-Permitted-Cross-Domain-Policies none;

    # Path to the root of your installation
    root /var/www/nextcloud/;		//* edit to own directory *//

    location = /robots.txt {
        allow all;
        log_not_found off;
        access_log off;
    }

    # The following 2 rules are only needed for the user_webfinger app.
    # Uncomment it if you're planning to use this app.
    #rewrite ^/.well-known/host-meta /public.php?service=host-meta last;
    #rewrite ^/.well-known/host-meta.json /public.php?service=host-meta-json
    # last;

    location = /.well-known/carddav {
      return 301 $scheme://$host/remote.php/dav;
    }
    location = /.well-known/caldav {
      return 301 $scheme://$host/remote.php/dav;
    }

    # set max upload size
    client_max_body_size 512M;
    fastcgi_buffers 64 4K;

    # Enable gzip but do not remove ETag headers
    gzip on;
    gzip_vary on;
    gzip_comp_level 4;
    gzip_min_length 256;
    gzip_proxied expired no-cache no-store private no_last_modified no_etag auth;
    gzip_types application/atom+xml application/javascript application/json application/ld+json application/manifest+json application/rss+xml application/vnd.geo+json application/vnd.ms-fontobject application/x-font-ttf application/x-web-app-manifest+json application/xhtml+xml application/xml font/opentype image/bmp image/svg+xml image/x-icon text/cache-manifest text/css text/plain text/vcard text/vnd.rim.location.xloc text/vtt text/x-component text/x-cross-domain-policy;

    # Uncomment if your server is build with the ngx_pagespeed module
    # This module is currently not supported.
    #pagespeed off;

    location / {
        rewrite ^ /index.php$uri;
    }

    location ~ ^/(?:build|tests|config|lib|3rdparty|templates|data)/ {
        deny all;
    }
    location ~ ^/(?:\.|autotest|occ|issue|indie|db_|console) {
        deny all;
    }

    location ~ ^/(?:index|remote|public|cron|core/ajax/update|status|ocs/v[12]|updater/.+|ocs-provider/.+)\.php(?:$|/) {
        fastcgi_split_path_info ^(.+\.php)(/.*)$;
        include fastcgi_params;
        fastcgi_param SCRIPT_FILENAME $document_root$fastcgi_script_name;
        fastcgi_param PATH_INFO $fastcgi_path_info;
        fastcgi_param HTTPS on;
        #Avoid sending the security headers twice
        fastcgi_param modHeadersAvailable true;
        fastcgi_param front_controller_active true;
        fastcgi_pass php-handler;
        fastcgi_intercept_errors on;
        fastcgi_request_buffering off;
    }

    location ~ ^/(?:updater|ocs-provider)(?:$|/) {
        try_files $uri/ =404;
        index index.php;
    }

    # Adding the cache control header for js and css files
    # Make sure it is BELOW the PHP block
    location ~ \.(?:css|js|woff|svg|gif)$ {
        try_files $uri /index.php$uri$is_args$args;
        add_header Cache-Control "public, max-age=15778463";
        # Add headers to serve security related headers (It is intended to
        # have those duplicated to the ones above)
        # Before enabling Strict-Transport-Security headers please read into
        # this topic first.
        # add_header Strict-Transport-Security "max-age=15768000;
        #  includeSubDomains; preload;";
        #
        # WARNING: Only add the preload option once you read about
        # the consequences in https://hstspreload.org/. This option
        # will add the domain to a hardcoded list that is shipped
        # in all major browsers and getting removed from this list
        # could take several months.
        add_header X-Content-Type-Options nosniff;
        add_header X-XSS-Protection "1; mode=block";
        add_header X-Robots-Tag none;
        add_header X-Download-Options noopen;
        add_header X-Permitted-Cross-Domain-Policies none;
        # Optional: Don't log access to assets
        access_log off;
    }

    location ~ \.(?:png|html|ttf|ico|jpg|jpeg)$ {
        try_files $uri /index.php$uri$is_args$args;
        # Optional: Don't log access to other assets
        access_log off;
    }
}
Now you can test your Nginx configuration by entering
nginx -t
If no error occurs, restart Nginx with
service nginx restart
Nextcloud Download and Installation
First, download the Nextcloud installation file from the Nextcloud homepage. Before downloading the file, you should visit the Nextcloud download page to check for the newest version.
wget https://download.nextcloud.com/server/releases/nextcloud-13.0.0.tar.bz2
After the download finished, extract the file to its directory:
tar -xjf nextcloud-13.0.0.tar.bz2 -C /var/www
If you want to, you can now delete the installation file:
rm nextcloud-13.0.0.tar.bz2
Now you have to set the correct user and group to the Nextcloud folder:
chown -R www-data:www-data /var/www/nextcloud
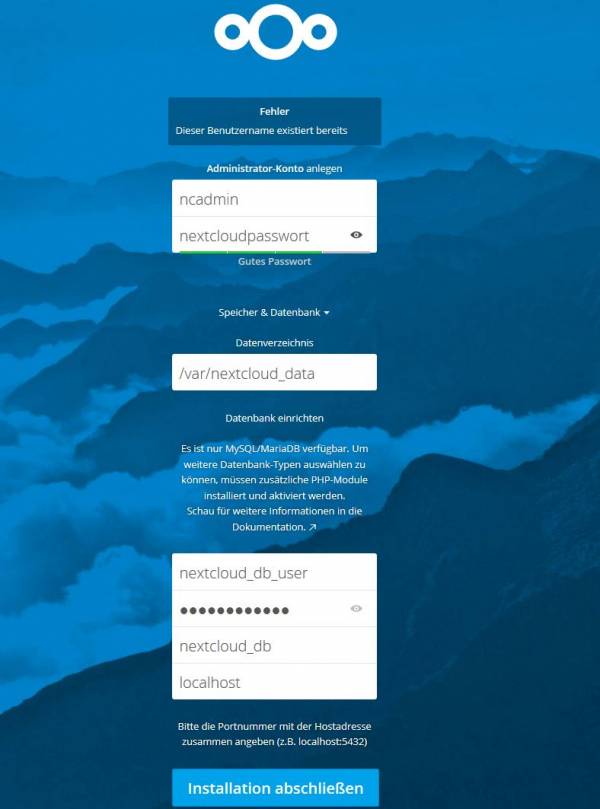
Now open your web browser and go to http://Ip-address-or-domain to enter the Nextcloud installation screen.
Here you have to set credentials for an administrator and enter the MariaDB user credentials you set earlier.
Configuration Nextcloud
After Nextcloud was installed succesfully, go to /var/www/nextcloud/config/config.php and add or edit the following lines:
- /var/www/nextcloud/config/config.php
'memcache.local' => '\OC\Memcache\APCu',
'trusted_domains' =>
 array (
	0 => 'mediacontainer.local',
	1 => '192.168.1.50',
 ),
'overwriteprotocol' => 'https',
'logtimezone' => 'Europe/Berlin',